Professional Commercial Painting Solutions
Commercial painting is a specialized field that requires precision, expertise, and the right tools. In a commercial setting, paints must be durable, attractive, and capable of withstanding heavy wear and tear. This page explores the types of paints, techniques, and tools used in commercial painting, as well as the pros and cons.
Optimum Types of Painting Solutions for Commercial Settings
Epoxy Paints:
Known for their durability and resistance to chemicals, they are often used in areas that require easy cleaning and maintenance. Epoxy paints are created by mixing a resin and a hardener. This combination forms a rigid and durable coating that adheres strongly to surfaces. These solutions are ideal for settings that require resistance to chemicals spills and high to heavy foot traffic. It's also useful for marine applications due to its water resistance. However, epoxy paints can be complex to apply, requiring careful preparation and exact mixing, and they are generally more expensive. Proper ventilation is also needed due to potential toxic fumes.
Acrylic Paints:
These are water-based and are preferred for their quick drying and environmental friendliness. They contain acrylic resin, pigments, and water. They are widely used in residential, commercial, and retail spaces for both interior and exterior surfaces. One of the main advantages of acrylic paints is their quick drying time, usually drying within hours. They are also eco-friendly due to low or zero Volatile Organic Compounds (VOCs) and can be easily cleaned with soap and water. Despite these benefits, acrylic paints are less durable than epoxy and may crack in extreme temperatures. Over time, the color of acrylic paints might fade, especially when exposed to direct sunlight which causes direct breakdown of the colour pigments.
Oil-Based Paints:
Provide a smooth, hard finish but can take longer to dry and may emit strong odors. Oil-based paints are made from a blend of oils and resins and have been a traditional choice for painting. They are commonly used in commercial settings where a smooth, glossy finish is desired, such as on doors, trims, and furniture. Oil-based paints provide an elegant, hard finish that many consider superior to other paint types. They are also known for their durability, making them suitable for high-traffic areas, and they retain a wet look longer, allowing for easier touch-ups. However, oil-based paints can take up to 24 hours to dry, slowing down projects. They may emit strong fumes that necessitate proper ventilation and are generally higher in VOCs, which can lead to potential environmental and health concerns.
Comercial Painting Installation in Ontario, Canada
Interested in having new paint installed professionally to increase the longevity of your space? Get in contact with our team to get a quote today!
Spraying
Spraying is often considered one of the quickest methods for painting large surfaces. When executed correctly, this technique can yield a very smooth and uniform finish. However, one of its disadvantages is the potential for overspray, which might lead to paint wastage. Another challenge is the extensive preparation it requires, as there's a need to mask and cover areas to prevent unintended paint application.
To employ the spraying technique:
- Use a spray machine, which pressurizes the paint and allows it to be atomized and sprayed out.
- It's essential to cover areas that shouldn't receive paint with masking tape and plastic sheets.
- Start by preparing the surface through thorough cleaning and priming.
- After setting up, mask areas that aren't meant to be painted.
- Load the paint into the spray machine and adjust the nozzle to get the desired spray pattern.
- When spraying, it's crucial to maintain a consistent distance from the surface and execute smooth, overlapping strokes.
- After completing the painting, always remember to clean the sprayer to prevent clogging.
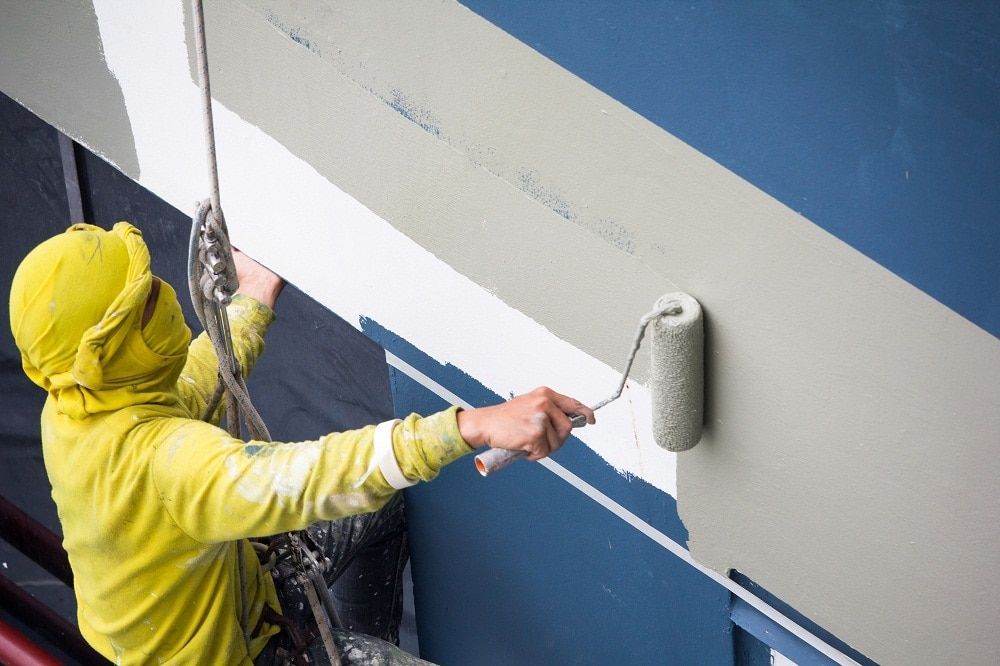
Rolling
Rolling is highly suitable for large surfaces as it offers even and consistent coverage. Compared to spraying, rolling has a reduced risk of overspray and therefore less potential wastage. However, a downside to rolling is the stippled texture it might leave, which some might find undesirable.
To use the rolling technique:
- Employ a roller brush, specifically designed for broader surfaces.
- Use a paint tray to hold the paint and to evenly load the roller.
- For high or hard-to-reach areas, extension poles can be a lifesaver.
- Begin by pouring paint into the tray.
- After dipping the roller into the paint and ensuring even coverage, start by rolling vertically.
- Follow up by cross-rolling horizontally to ensure an even coat.
- Gentle pressure is key to avoiding thick lines or drips.
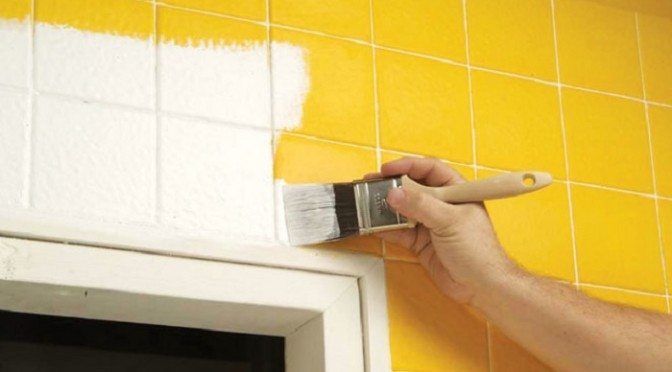
Brushing
Brushing is the go-to technique when precision is paramount. It's particularly useful for detailed work and edges. One of the key advantages of brushing is the ability to create a distinct texture. On the flip side, using a brush can be time-consuming, especially over large areas.
For a flawless brush painting experience:
- Select brushes according to the surface and the desired finish. Brushes vary in size and bristle type.
- For paint, you can dip your brush directly into the paint can.
- Start the painting process by focusing on edges and corners, employing the brush's tip for maximum precision.
- For more expansive areas, long, even strokes are preferred.
- Always blend brush strokes while the paint is still wet to achieve a seamless finish.
- After painting, it's essential to clean brushes with the appropriate solvents.

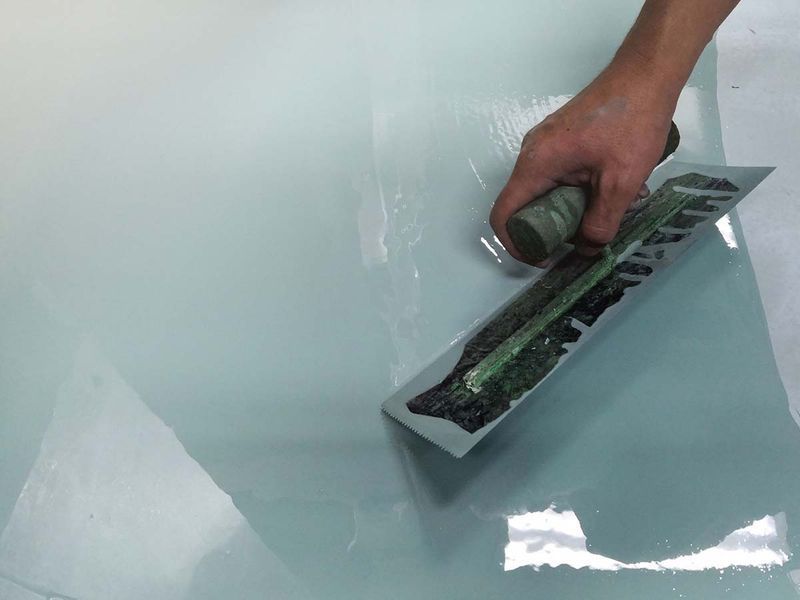
How to Paint Epoxy, Using a Trowel
Surface Preparation
Before beginning the painting process, it's vital to ensure the wall surface is meticulously clean. Remove all dirt, grime, and any flaking old paint. If there are any imperfections, such as holes or cracks, they should be addressed and patched. The wall should then be lightly sanded to provide a slightly rough texture, ensuring better adhesion for the epoxy paint. After sanding, remove all dust and debris either by vacuuming or wiping.
Mixing the Epoxy
Commercial epoxy paint typically comes in two separate components: a resin and a hardener. These must be combined in the exact proportions stipulated by the paint manufacturer. Using an electric drill fitted with a mixing paddle can help achieve a homogeneous blend. While thorough mixing is crucial, be careful to avoid introducing excessive air bubbles into the mixture.
Applying the Primer (if required)
Some epoxy paints necessitate a primer, especially for surfaces that haven't been painted previously or that have absorbed moisture. If using a primer, apply it uniformly with a roller or brush and then let it dry as per the manufacturer's instructions.
Using the Trowel for Epoxy Application
Begin by pouring a manageable amount of the mixed epoxy paint onto a tray or directly onto the wall. Position the trowel at a 45-degree angle to the wall, facilitating a smooth spread of the paint. Spread the epoxy paint evenly across the wall, maintaining consistent pressure and angle with the trowel. Ensure trowel strokes slightly overlap to avoid visible lines or gaps.
Introducing Decorative Elements (if desired)
For a unique decorative touch, you can add elements like color chips or flakes to the wet epoxy paint. While this step is optional, it adds aesthetic variety to the wall. Distribute these decorative elements uniformly for a consistent look.
Application of the Top Coat (if necessary)
After the primary layer of epoxy paint has dried (duration determined by manufacturer's guidelines), a clear top coat may be necessary. This layer enhances the paint's durability and provides a glossier, finished appearance. Use the trowel to apply the top coat in a manner similar to the base layer.
The Curing Process
It's imperative to allow the epoxy paint ample time to cure. The wall should remain undisturbed for at least 24 hours or as recommended by the paint's manufacturer.
Additional Tips
Prioritize safety by wearing essential protective gear, including gloves, safety goggles, and a mask. Given the quick-setting nature of some epoxy paints, having an assistant can be beneficial, especially for larger walls.
By closely following these instructions and the specific guidelines provided by the epoxy paint manufacturer, you can expertly apply epoxy paint to commercial walls using a trowel, achieving a durable and refined finish.